
Lacrimosa is the weeping heart of Mozart’s Requiem, the music he left unfinished on his deathbed, and the interactive player below makes it approachable: hear it at half speed, watch the notes and keys light up, and drag the score to any phrase. Easy sheet music, fingering, and a free printable PDF follow.
Learn it with the interactive player
- Slow it down: x0.5 or x0.75 while you learn the notes, back to x1 once they flow.
- Pause anywhere: the current keys stay lit so you can find them on your own piano.
- Drag the score left or right, or use the 15s buttons, to replay a phrase.
The sheet music, section by section

Play Section A at x0.5 on the player: the tears motif sighs A4, B-flat 4, A4, then G4 falling to F4 - shape each two-note slur like a small sob, leaning on the first note and releasing the second.

Section B rises: C5, B-flat 4, A4 begins the climb toward the amen, and the melody sinks by step to the final long D. The left hand keeps its one dotted half per measure - let each bass note ring underneath the whole sigh.
The full score
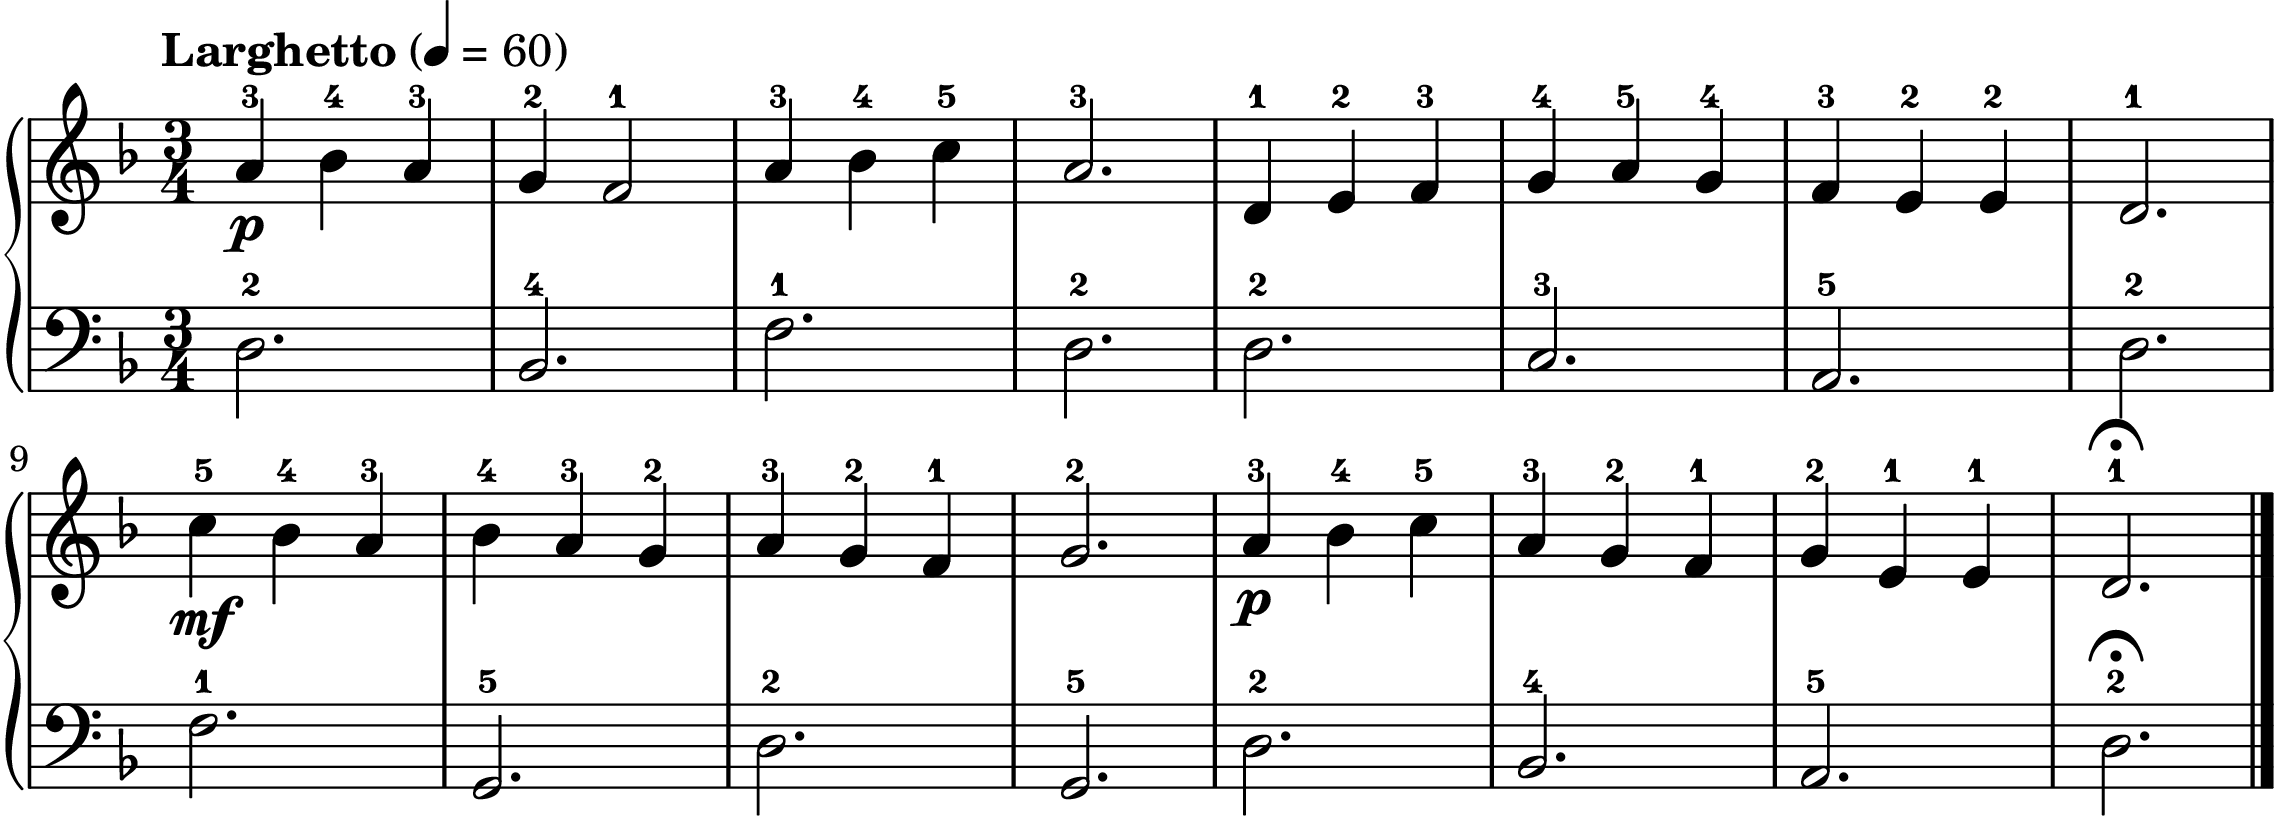
At Larghetto, the full score should breathe in slow 3/4 waves; play it quietly, without hurry, and treat the closing measures as an amen rather than an ending.
Note by note: keys and fingering
- Right hand: The tears motif sits over F4 (1), G4 (2), A4 (3), B-flat 4 (4), C5 (5) - the sighing two-note slurs fall A4-G4 and G4-F4 inside that hand. For the low answering phrase the thumb shifts to D4, so the hand climbs D4 (1), E4 (2), F4 (3), G4 (4), A4 (5) and back.
- Left hand: One dotted half note per measure: index (2) on D3, ring (4) on B-flat 2, thumb (1) on F3, middle (3) on C3, pinky (5) on A2 and, after a shift, on G2.
| Note | On the Staff | On the Keyboard | Finger |
|---|---|---|---|
| F4 | First space of treble staff | White key left of the three black keys above middle C | RH Thumb (1) |
| G4 | Second line of treble staff | White key between the first two of three black keys | RH Index (2) |
| A4 | Second space of treble staff | White key between the last two of three black keys | RH Middle (3) |
| Bb4 | Third line of treble staff, with a flat sign | Black key left of B4, the last of the three black keys | RH Ring (4) |
| C5 | Third space of treble staff | White key left of the two black keys above middle C | RH Pinky (5) |
| D4 | Just below the bottom line of the treble staff | White key between the two black keys above middle C | RH Thumb (1) |
| E4 | First line of treble staff | White key right of the two black keys above middle C | RH Index (2) |
| D3 | Middle line of bass staff | White key between the two black keys below middle C | LH Index (2) |
| Bb2 | Second line of bass staff, with a flat sign | Black key left of B2, two octaves down | LH Ring (4) |
| F3 | Fourth line of bass staff | White key left of the three black keys below middle C | LH Thumb (1) |
| C3 | Second space of bass staff | White key left of the two black keys below middle C | LH Middle (3) |
| A2 | First space of bass staff | White key between the last two of three black keys, two octaves down | LH Pinky (5) |
| G2 | First line of bass staff | White key between the first two of three black keys, two octaves down | LH Pinky (5) |
Prefer a video? Watch the keys light up
Same color code as the player: green marks the right hand, blue the left hand, with the score and keyboard in one vertical video.
The story behind the Lacrimosa
Mozart began the Lacrimosa in the autumn of 1791 while composing his Requiem in D minor, K. 626, a commission delivered by an anonymous messenger. He died on December 5 of that year with only the first eight measures of the movement written, making these bars the last music he ever set down. His student Franz Xaver Sussmayr completed the Lacrimosa and the rest of the Requiem so Mozart's widow Constanze could collect the fee. The text, Latin for weeping, describes the tearful day of judgment - which ties this movement to the same Dies Irae tradition that opens our collection. This arrangement keeps the sighing theme in D minor.
Get the printable PDF
The printable PDF of this easy Lacrimosa theme - full score, hand positions, and a step-by-step practice guide - ships inside our free Halloween pack together with fourteen other spooky pieces.
Quiet, expressive phrasing comes easiest when you are seated well, and an Adjustable Piano Bench with Back Support holds you at the right height through every long, soft measure.
FAQ
How hard is Lacrimosa on piano?
The choral original is written for choir and orchestra, and full piano transcriptions are advanced. This theme arrangement closes Level 3 of our Halloween collection: two five-finger positions in D minor, the black key B-flat 4 under the ring finger, and a one-note-per-measure bass.
How long does it take to learn Lacrimosa?
Two to three weeks at this level. The notes come quickly at 60 BPM; the artistry - shaping the two-note sighs, balancing the melody over the dotted-half bass, shifting cleanly between the F4 and D4 hand positions - is what deserves the extra days.
What level is Lacrimosa?
Level 3 of our Halloween collection, the Midnight Classics. It is the expressive summit of the set: a flat-key signature, position shifts, a left hand that changes note every measure, and phrasing that only works with real dynamic control.
What are the notes for Lacrimosa?
The tears motif is A4, B-flat 4, A4, then G4, F4, followed by A4, B-flat 4, C5 sinking to A4. The low answer climbs D4, E4, F4, G4, A4, G4 and falls back to D4. Section B starts C5, B-flat 4, A4 and descends to the final D. The left hand plays D3, B-flat 2, F3, C3, A2, and G2, one per measure. Full table above.